PART III - Install, Setup and Configure Microsoft CRM Server 2013.
Hardware Requirements
The following table lists the minimum and recommended hardware requirements for Microsoft Dynamics CRM Server 2013 running in a Full Server configuration. These requirements assume that additional components such as Microsoft SQL Server, Microsoft SQL Server Reporting Services, SharePoint, or Microsoft Exchange Server aren't installed or running on the system

Software Requirement
Microsoft Dynamics CRM 2013
Server can be installed only on Window Server 2008 and Window Server 2012 x64
based computers. The following table show the supported version and editions

Active Directory Requirements
- The following Active Directory requirement must be met before proceeds Microsoft CRM 2013 installation.
- The computer that runs Microsoft CRM Server 2013 roles and the computer that runs Microsoft SQL Server 2012 must be in the same Active Directory domain
- The Active Directory domain where a Microsoft Dynamics CRM Server 2013 role is located must run in:
- Windows Server 2003 Interim
- Windows Server 2003 Native
- Windows Server 2008 Interim
- Windows Server 2008 Native
- Windows Server 2012 domain modes
- Copy the desired version of the Microsoft CRM Server 2013 to be installed in the C:\CRM2013Server folder of the System.


- Run Microsoft Dynamics CRM Server 2013 Setup.exe by navigating to the directory.
It is recommended to do it with 'Run as Administrator'

- Select Get updates for Microsoft Dynamics CRM => Click Next

- Click Next

- Enter the Microsoft CRM Server 2013 software license keys

- Click I accept this license agreement, and then click I Accept

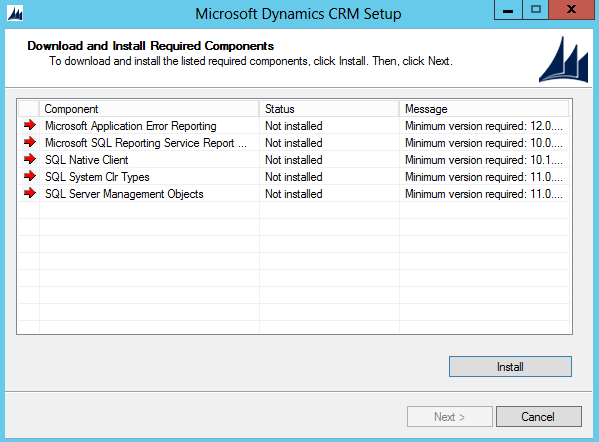
- Click Install => Then click Next
- Select the Installation location => Click Next

- Select all the Server Role

- Enter the SQL Server 2012 server name "SQL08"

- Select the AD Organization Unit => Click Next

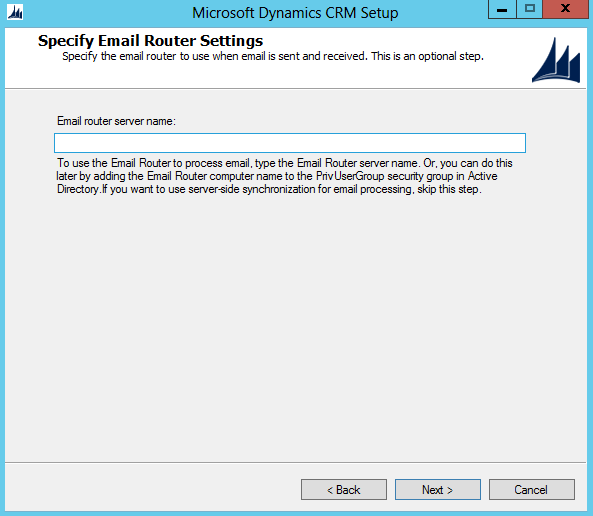
- Enter the service accounts


- Select create a new website and enter port number

- Specify the Organization Settings
- In the Display Name => Enter the Organization name
- In the Unique Database Name box, the name is automatically generated or you can type a unique name that must be limited to 30 character. Spaces and extended character are not allowed.
- Under ISO currency code => Click Browse => Select the ISO currency code that you willuse as the base currency for the organization in the list => Click OK
- In the SQL collation => keep the default selection or select a different database collation that the organization database will use or sort and compare data characters. => Click Next.

- Enter the Report Server URL => http://sql07/ReportServer => Click Next

- Help us Improve the Customer Experience
- On the Help us Improve the Customer Experience page, select whether you want to participate in the Customer experience Improvement Program => Click Next

- Select Microsoft Update Option Page
- Use Microsoft Update when i check for updates (recommanded) => Selecting this option, Microsoft Dynamics CRM Server 2013 will use the Microsoft update settings on the computer.
- I don't want to use Microsoft update => Selected this option if the computer use another method to install updates such as by using Microsoft Windows Server Update Serives (WSUS)

- Ready to Install Microsoft Dynamics CRM 2013 Server Setup => Click Next
- Review the Ready to Install Microsoft Dynamics CRM page, and then click Back to correct any warnings.
- System Checks => Click Next
- This page is a summary of all requirements and recommendation for a successful installtion. Erros must be resolved before the installation can continue. If there are no errors, or only warnings apprear, the installation can continue.

- Ready to Install Microsoft Dynamics CRM Server 2013 => Click Install
- Review the Ready to Install Microsoft Dynamics CRM Server 2013 page.
- Once the Microsoft CRM Server 2013 completed. Bring up the Microsoft CRM Server 2013 site.

PART I - Install, Setup and Configure Window Server 2012
http://crm2013notes.blogspot.com/2014/01/setup-install-and-configure-microsoft.html
PART II - Install, Setup and Configure Microsoft SQL Server 2012
http://crm2013notes.blogspot.com/2014/02/part-ii-install-setup-and-configure.html


